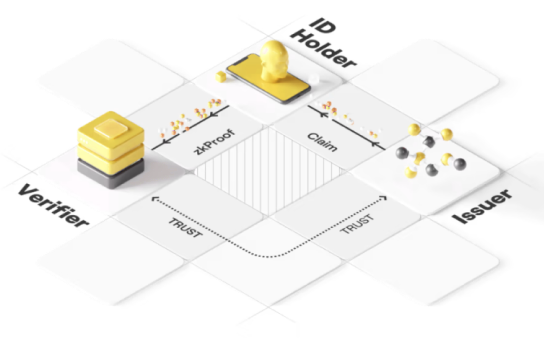
Web Wallet

The Web Wallet is a web tool meticulously developed to streamline the verification process of credentials. Built for verifiers, it seamlessly integrates into your applications, enhancing the user experience by facilitating the request and verification of credentials within a unified and simplified workflow.

Features

  • Seamless Authentication and Credential Management: This tool enables users to authenticate via their Ethereum wallets, and automatically creates a derived identity wallet. Credentials undergo encryption using keys and are securely stored in end-to-end encrypted cloud storage*, facilitating effortless access across multiple devices while streamlining processes.
note

*The Cloud Storage serves as a secure repository for encrypted credentials, offering users the convenience of multi-device access to credentials and serving as a reliable backup solution. When a user signs the message using their Ethereum private key, an identity is derived and storage keys are generated. The digital signature scheme employed is ed25519. All the documents stored in the storage are end-to-end encrypted using AES256-GCM, guaranteeing that only the user with the storage keys can access his credentials, reinforcing the security of the stored information.

  • Enhanced User Experience: Prioritizing simplicity, the Web Wallet presents a user-friendly interface. From identity creation to credential claiming and verification, all steps seamlessly integrate, minimizing complexity.
  • Embedded Issuance: The Web Wallet provides embedded issuance, allowing users to claim their credentials within the verification flow if they haven't done so before.
note

Currently, the tool supports embedded issuance for only two types of credentials:

  • Proof of Identity (refer to the schema here)
  • Proof of Life (refer to the schema here)

The tool still supports the verification of other credentials, which can be issued on the Polygon ID Wallet App.

  • Simplified Integration: Integration into your application is effortless, reducing the development workload and ensuring swift implementation.
  • On-Chain and Off-Chain Query Verification: Supporting both on-chain and off-chain query verification, the Web Wallet offers flexibility to meet diverse verification needs.
  • Consistency and Accuracy: With a standardized interface, the tool promotes uniformity across users and organizations, minimizing errors.

Getting Started

You can experience a demo of the Web Wallet by visiting this link

User Interface and Experience

Embedded Issuance and Verification Journey for End Users

Let's walk through an example scenario: Suppose a user needs to validate their humanity to perform specific actions (e.g. registration or posting a review) within an application.

  1. Initiating the Process: The user clicks the designated button on the application, triggering redirection to the Web Wallet.
  2. Connecting the Wallet: Upon arrival, the user selects 'Connect Wallet' and connects their Ethereum wallet with the tool.
  3. Creating Identity and Accessing Credentials: Next, the user selects 'Sign Message' to create a derived identity wallet and retrieve the encrypted credentials associated with their Ethereum wallet via the cloud storage.
  4. Claiming the Credential: If the user hasn't previously claimed the credential required by the verifier’s request, they proceed by clicking 'Claim Credential' and complete the issuance process (a face scan in this scenario) to claim the credential via the embedded issuance.
  5. Proof Generation: Once the user owns the credential, they can select 'Verify,' triggering the generation of the zk-proof. This proof is then shared with the verifier application for off-chain verification or submitted to the smart contract for on-chain verification.
  6. Requesting Mobile Verification: Alternatively, the user can click the “Verify from Mobile” button to start the verification from a mobile device. A QR code will be presented, which the user scans using the Polygon ID App (where they have already claimed the credential). This initiates proof generation and begins the verification process.
  7. Verification Completion: The user finally clicks the ‘Continue’ button, upon which they are redirected to the application where the verification can be completed and the application flow can continue.
note

For credentials that do not support embedded issuance directly through the Web Wallet, applications can still facilitate a seamless verification process. Users who have previously issued credentials stored on their mobile devices can continue the verification from their mobile device. To do this, users can simply click the “Verify from Mobile” button in the Web Wallet interface. This action seamlessly integrates with the existing credentials on their device, allowing them to continue with the verification flow without interruption.

Integration Process for the Verifiers

Step 1 - Choosing Your Credential Schema

Select the credential schema that aligns with your requirements from our Schema Explorer or any other source. Standardized schemas, such as KYC, are available. Alternatively, you can create a custom schema using our Schema Builder.

Step 2 - Creating the Query

Define what information you need from your users and build a query using the Query Builder. Once you create the query, you can select the network and test your query. Copy the generated code snippet of the query for later integration into your verifier setup.

Step 3 - Setting up the verifier

The verifier can be setup in your application using the Verifier SDK or the JS SDK. The verification can be performed in two ways:

note

The server setup for Off-Chain Verification and the Smart Contract setup for On-Chain Verification, as detailed in the provided links, remain unchanged. The only modification required is in the client side of the application. Previously, proof requests could only be shared via embedded QR codes. Now, verifiers have a new, more efficient method for requesting proofs from users by leveraging the Web Wallet.

note

In Case of Off-Chain Verification, once the user goes through the flow of verification in the Web Wallet, the zero-knowledge proof is returned as a JWZ token in a callback to your verifier backend. You need to handle this callback coming from the Web Wallet and verify the proof.

Step 4 - Integrating the Web Wallet on the Client Side

Integrating the tool on the client side is straightforward. Simply redirect users from your application to the Web Wallet URL. This URL must include the verification request encoded in base64 in the fragment of the URL.

https://web-wallet-test.polygonid.me/#base64EncodedData
caution

For security reasons, integration of this tool via IFrame is not supported. Redirecting users is the recommended method for accessing our Web Wallet to ensure secure interaction.

Below is a code example for integrating the Web Wallet on the client side in JS:

// Define the verification request
const verificationRequest = {
backUrl: "https://my-app.org/back",
finishUrl: "https://my-app.org/finish",
logoUrl: "https://my-app.org/logo.png",
name: "My app",
zkQueries: [
{
circuitId: "credentialAtomicQuerySigV2",
id: 1711399135,
query: {
allowedIssuers: ["*"],
context:
"https://raw.githubusercontent.com/anima-protocol/claims-polygonid/main/schemas/json-ld/pol-v1.json-ld",
type: "AnimaProofOfLife",
credentialSubject: {
human: {
$eq: true,
},
},
},
},
],
callbackUrl: "https://my-app.org/api/callback",
verifierDid: "did:polygonid:polygon:amoy:2qV9QXdhXXmN5sKjN1YueMjxgRbnJcEGK2kGpvk3cq",
};

// Encode the verification request to base64
const base64EncodedVerificationRequest = btoa(JSON.stringify(verificationRequest));

// Open the Polygon ID Verification Web Wallet with the encoded verification request
window.open(`https://web-wallet-test.polygonid.me/#${base64EncodedVerificationRequest}`);
"Allowed Issuers"

When we use * in the "allowed issuers" segment (allowedIssuers: ['*']), we mean that we accept any entity that might have provided the credential. Even though this seems to be convenient for testing purposes, it may also be considered risky. Applying due diligence by actually choosing trusted specific issuers should be the best approach. Only in rare cases, a verifier would accept any issuer, so we advise not to use *.

backUrl represents the URL of your application where the user will be redirected when they click the ‘Back’ button

finishUrl represents the URL of your application where the user will be redirected once the proof has been successfully generated and, they click the ‘Continue’ button

name represents the name of your Application.

zkQueries represents the query you request your users to verify. Input the generated code snippet of the query in Step 2.

note

Currently, only one zk-query can be verified in a verification request. However, in the future, the capability to verify multiple zk-queries in a single verification request will be introduced.

verifierDiD represents the DiD of the verifier (your DID).

For off-chain verifications only:

callbackUrl represents the URL of the API endpoint of your verifier backend server which handles the callback.

For on-chain verifications only:

transactionData represents the details regarding the on-chain transaction that needs to be invoked by the Web Wallet to do the on-chain verification.

contractAddress represents the address of the smart contract where the zk-proof would be submitted.

functionName represents the name of the function that would be called on the smart contract mentioned above.

chainID and network represent the network details on which the on-chain verification would occur.